Docker: Build Azure DevOps Build Agent Image and run as a Docker Container

For many years I have been using TFS/VSTS/DevOps to manage different organization's continuous integration. I have been using CI for many projects, and while it is possible to use Azure hosted agents and also at a very fair price (1800 minutes for free each month), I find that it is sooo much faster to run builds on our own self hosted agents. Then we will have to manage the build servers/agents, but with Docker that is just a bliss.
So, if you want to know how to spin up a fresh new built agent that will build your .net projects in minutes, then please read on 😊
Prerequisites
- A computer running Docker for Windows containers
- An Azure DevOps subscription
Scope
For the scope of this article we are just going to use Docker for Desktop, in real life you would probably want to run the build agents on a Windows Server with Containers. That is what we are doing but setting up a server with containers is out of scope for this article and not directly related to building the Docker image for our build agents.
Creating the Docker Image
- Create a new folder that will be our base directory for the following steps, give it a name, for instances Dockeragent
- Create a file: Dockerfile (no extension, and with exactly the D capitalized)
- Create a file: start.ps1
Dockerfile
We will base our image on Windows Server Core 20H2, then we will install the bare minimum .NET build tools, not VS installation, just the tools required to build.
To do so, here's how our Dockerfile should look:
# escape=`

FROM mcr.microsoft.com/windows/servercore:20H2

# Download channel for fixed install.
ARG CHANNEL_URL=https://aka.ms/vs/16/release/channel
ADD ${CHANNEL_URL} C:\TEMP\VisualStudio.chman

# Download and install Build Tools for Visual Studio 2017.
ADD https://aka.ms/vs/16/release/vs_BuildTools.exe C:\TEMP\vs_buildtools.exe
RUN C:\TEMP\vs_buildtools.exe --quiet --wait --norestart --nocache `
    --channelUri C:\TEMP\VisualStudio.chman `
    --installChannelUri C:\TEMP\VisualStudio.chman `
    --add Microsoft.VisualStudio.Workload.AzureBuildTools `
    --add Microsoft.VisualStudio.Workload.MSBuildTools `
    --add Microsoft.VisualStudio.Workload.NetCoreBuildTools

SHELL ["powershell", "-Command", "$ErrorActionPreference = 'Stop'; $ProgressPreference = 'SilentlyContinue';"]

WORKDIR /azp

COPY start.ps1 .

CMD powershell .\start.ps1
start.ps1
This file is taken from Microsoft's article on setting up a self hosted build agent - this article is a great start, they don't really tell you have to add capabilities and run the container, hence this blob post 😁
Copy/paste this into start.ps1:
if (-not (Test-Path Env:AZP_URL)) {
    Write-Error "error: missing AZP_URL environment variable"
    exit 1
  }

  if (-not (Test-Path Env:AZP_TOKEN_FILE)) {
    if (-not (Test-Path Env:AZP_TOKEN)) {
      Write-Error "error: missing AZP_TOKEN environment variable"
      exit 1
    }

    $Env:AZP_TOKEN_FILE = "\azp\.token"
    $Env:AZP_TOKEN | Out-File -FilePath $Env:AZP_TOKEN_FILE
  }

  Remove-Item Env:AZP_TOKEN

  if ((Test-Path Env:AZP_WORK) -and -not (Test-Path $Env:AZP_WORK)) {
    New-Item $Env:AZP_WORK -ItemType directory | Out-Null
  }

  New-Item "\azp\agent" -ItemType directory | Out-Null

  # Let the agent ignore the token env variables
  $Env:VSO_AGENT_IGNORE = "AZP_TOKEN,AZP_TOKEN_FILE"

  Set-Location agent

  Write-Host "1. Determining matching Azure Pipelines agent..." -ForegroundColor Cyan

  $base64AuthInfo = [Convert]::ToBase64String([Text.Encoding]::ASCII.GetBytes(":$(Get-Content ${Env:AZP_TOKEN_FILE})"))
  $package = Invoke-RestMethod -Headers @{Authorization=("Basic $base64AuthInfo")} "$(${Env:AZP_URL})/_apis/distributedtask/packages/agent?platform=win-x64&`$top=1"
  $packageUrl = $package[0].Value.downloadUrl

  Write-Host $packageUrl

  Write-Host "2. Downloading and installing Azure Pipelines agent..." -ForegroundColor Cyan

  $wc = New-Object System.Net.WebClient
  $wc.DownloadFile($packageUrl, "$(Get-Location)\agent.zip")

  Expand-Archive -Path "agent.zip" -DestinationPath "\azp\agent"

  try
  {
    Write-Host "3. Configuring Azure Pipelines agent..." -ForegroundColor Cyan

    .\config.cmd --unattended `
      --agent "$(if (Test-Path Env:AZP_AGENT_NAME) { ${Env:AZP_AGENT_NAME} } else { ${Env:computername} })" `
      --url "$(${Env:AZP_URL})" `
      --auth PAT `
      --token "$(Get-Content ${Env:AZP_TOKEN_FILE})" `
      --pool "$(if (Test-Path Env:AZP_POOL) { ${Env:AZP_POOL} } else { 'Default' })" `
      --work "$(if (Test-Path Env:AZP_WORK) { ${Env:AZP_WORK} } else { '_work' })" `
      --replace

    Write-Host "4. Running Azure Pipelines agent..." -ForegroundColor Cyan

    .\run.cmd
  }
  finally
  {
    Write-Host "Cleanup. Removing Azure Pipelines agent..." -ForegroundColor Cyan

    .\config.cmd remove --unattended `
      --auth PAT `
      --token "$(Get-Content ${Env:AZP_TOKEN_FILE})"
  }
You will notice that the start.ps1 takes a few variables, read along and see how we will pass those on...
Building the Image
Now, in PowerShell, inside our base directory where we created the 2 files, run the following:
docker build -t win:latest .
This will build and image with name win. You can give it another name, we are using this because we put our images in a registry like this: custom.azurecr.io/imageGrouping/imageName and thus like to keep our image names short.
The above command can take a little while the first time you run it, but since Docker uses layers, this will be fast next time after the dependencies has been downloaded.
Running the Container
Now on to actually running the container. Remember the variables in start.ps1? Here's how to run the container passing those variables:
$azureDevOpsUrl = "https://dev.azure.com/your-team"
$azurePat = "PAT"
$azureDevOpsPool = "default"
$dockerImageName = "win"
$dockerRegistry = ""
$dockerTag = ":latest"
$dockerImage = $dockerRegistry + $dockerImageName + $dockerTag
$agentName = $dockerImageName + "-" + [System.guid]::NewGuid().toString().SubString(0, 6)

Write-Output $dockerImage
Write-Output "Agent name: $agentName"

docker run `
    -d `
    --name $agentName `
    --restart unless-stopped `
    -e AZP_POOL=$azureDevOpsPool `
    -e AZP_URL=$azureDevOpsUrl `
    -e AZP_TOKEN=$azurePat `
    -e AZP_AGENT_NAME=$agentName `
    $dockerImage
The above script will start a new container, generate an agent name and use that both as the container name and the agent name in DevOps. If you want to use a Docker Registry, then fill in the URL in the variables section and the image will be pulled from there.
Now you can basically fire up a new build agent by just running the above docker command 😀
Here's how it look in DevOps:
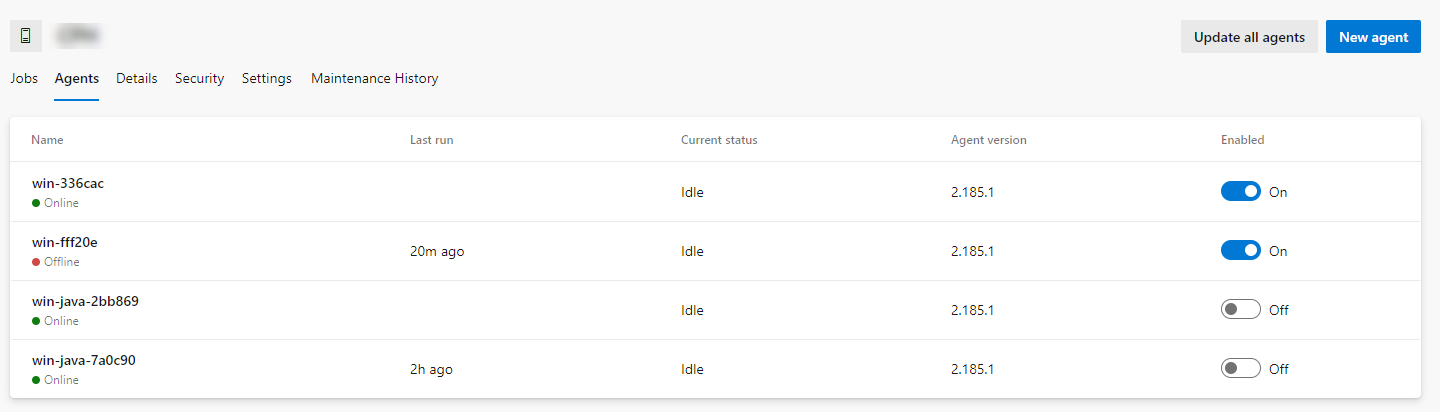
Notice that I also have some with "java" in the name. That's because we need to run some SonarQube analysis, and that requires java. More on that at a later time.
Wrap Up
Thanks for reading, hopefully you now know how to use a Dockerfile to create a Docker Image, run that image as a container for an Azure DevOps build agent running on Windows Server.
Please let me know if you have any questions/comments!
About the author
Copenhagen based cloud developer. Love to code and to make complex solutions simple!
Comments
Join the discussionNo comments yet. Be the first to comment.